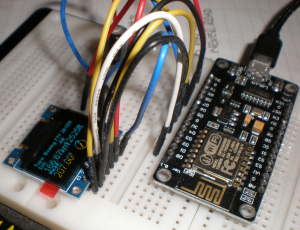
There’s a metric ton of those tiny, cheap, 0.96″ displays for sale out there, but one of the drawbacks is that you’re never quite sure which of the interface type you’ll be getting (the photos displayed by the vendors rarely match to the shipped product and the descriptions almost never do). I ended up with an SPI version on my bench the other week, when what I was really after was the good old I2C version. Oh well, how hard can this be, anyway?
Well, when you look at the back of the display there are some silk-screened instructions for what combination of resistors are used for which interface, but I have to admit that the idea of moving SMD devices of that size around without losing one on the floor, or pulling off a trace, didn’t seem too attractive to me. An internet search found a StackExchange thread dealing with the subject and, although the procedure described didn’t look too intimidating after all, it also yielded important clues to the connections needed to have the module just work in its intended mode of SPI. I was using a Node-MCU module, so I had pins to spare for the extra three wires, so it wasn’t really much extra effort to slap the whole lot onto a breadboard and mess around to try and get it working.  I was also using Squix’s “PlaneSpotter” package as the software to test it with, as Squix’s excellent implementation of the SSD1306 driver library is claimed to be interface agnostic and should work with the SPI as well as the I2C interface (all of his current examples use the I2C interface).
The one thing that did confuse me to begin with were which of the SPI pins to connect on the ESP side; specifically the “DI” and “DO” pins from the display. It’s SPI, so those should be the MOSI and MISO lines, right? Err ..no! With the help of the above mentioned StackExchange thread, I eventually cottoned-on to the fact that the display doesn’t use DO as MISO at all, it uses it as the SPI clock line, so ignore that wonderfully helpful labelling on the display connector.
The next step was working out which pins were which on the Node-MCU. This is the first time I’ve used one of these beasties and I didn’t find its pin labelling particularly helpful, either (on the other hand, it is undeniably a nice packaging of the ESP module and USB interface components). Eventually I got it all worked out, loaded up “PlaneSpotter” and had Tokyo to Seoul traffic showing up first try (all due to Squix’s neat programming and packaging).
Well that was the test part and now that I’ve verified that the display works, I need to move on to implementing my own, more modest project. Before I leave you though, I’d just like to make a note of the hardware connections and minor software changes which were needed, as they might be of help to someone else.
First, here are the connections for both Node-MCU and normal ESP8266 GPIO pins for the display:-
| Display | NodeMCU | ESP8266 | ||
| CS | – | D8 | – | GPIO15 |
| DC | – | D4 | – | GPIO2 |
| RES | – | D0 | – | GPIO16 |
| DI | – | D7 | – | GPIO13 |
| DO(CLK) | – | D5 | – | GPIO14 |
…and here are the changes to the main.cpp file of the PlaneSpotter code. As you can see, we just comment-out the I2C defines and add our own pin definitions below (note that the SPI pins, DI, DO and SCL, are hard-coded into the ESP8266 library and can’t be changed):-
// Display Settings

//const int I2C_DISPLAY_ADDRESS = 0x3c;

//const int SDA_PIN = D2;

//const int SDC_PIN = D3;
// 4-pin SPI Version.

const int RES = D0; // GPIO16. \

const int DC = D4; // GPIO2. - Normal ESP pin numbering.

const int CS = D8; // GPIO15. /
Next we just comment-out the init call for the I2C version and add in the call to the SPI one:-
// Initialize the oled display for address 0x3c

// sda-pin=14 and sdc-pin=12

//SSD1306Wire display(I2C_DISPLAY_ADDRESS, SDA_PIN, SDC_PIN);

//SH1106Wire display(I2C_DISPLAY_ADDRESS, SDA_PIN, SDC_PIN);

SSD1306Spi display(RES, DC, CS);

OLEDDisplayUi ui(&display);
For all of the other required local settings for this app, please refer to Squix’s notes.
[…] tuner chip and specifically for receiving 1090Mhz ADS-B traffic from aircraft flying overhead (see the previous post on “PlaneSpotter”). Not only does this thing get hot, it -doesn’t- have an R820T tuner chip at all (they use […]
LikeLike